Ricochet is the best place on the internet to discuss the issues of the day, either through commenting on posts or writing your own for our active and dynamic community in a fully moderated environment. In addition, the Ricochet Audio Network offers over 50 original podcasts with new episodes released every day.
 Operation: Drain the Swamp. Bathroom Remodeling

Master bath, but the kids’ version had a double sink
Thirteen years of wear and tear on a house will show its true character, particularly if the kids are the ones doing the wearing and tearing. Even more so if the builder of the house was less than attentive or caring to its quality of work.
After 13 years of overflowing tubs, hot steamy showers with the vent fan off, cats who had a fetish for removing any and all caulking they could find, water had gotten into every nook and cranny where it should not go, and the kids’ bathroom was rotting apart. At the beginning of July, I dusted off my Weekend Warrior membership card and set to work on the long process of gutting and rebuilding their bathroom. I finally finished it the very last day of September. I probably could have gotten it done sooner, but my work time was largely limited to weekends and a couple of odd days I kipped off my job. I could have paid someone else to do all this, but I’m guessing I would have spend a lot more money on labor, and the materials costs were already high enough.
Besides, this would be my fourth bathroom rebuilding (one at our first house 16 years ago, and two other rebuilds at our current house), how hard could it be? Damn hard, as it turned out. We had come to liken this bathroom to a swamp, given the way our four kids had ensured that it was continually damp and had started to smell of mold and mildew. We knew last year that something bad was brewing when showers would occasionally mean wet floors downstairs — it turned out that a loose tub tap was jetting water backwards into the wall. I fixed that, but it made our minds uneasy about what else was lurking. Over the July 4th weekend, we dove in.
Let’s get to work!
Demolition
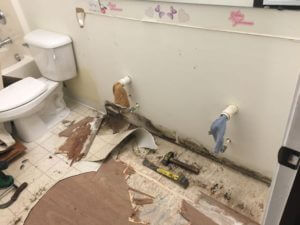
Water would collect here, a low point with no underlayment
The very first thing I did was to disconnect the faucets and sink drains and heave them in the trash. I suppose I could have re-used them, but really they were builder-grade crap from when the house was built. No sentimental value there. My wife and I pulled off the massive faux granite counter and double-sink and hauled it downstairs and out to the yard, only dropping it on my toes once. After that, I unbolted the cabinets from the wall, whereupon they immediately reverted to their native saw dust. Thirteen years of water damage had rotted them at the bottom, and I left a trail of moldy wood particles from the upstairs out to the lawn by the old sinks. Underneath, I confirmed my worst suspicions — black mold.
It seems that the builders, while laying sheet vinyl over the entire bathroom floor, had not put any underlayment where the cabinets would go, leaving a low pocket for errant bath water to collect. I peeled up the vinyl and found black stains all along and up into the wall here. No matter, I knew I’d be replacing wallboard too. But then I removed the rest of the floor and the innumerable staples where there really was underlayment, and when I got to the edge of the tub I found the subflooring so rotten that I could sink a screwdriver through it.

The edge of the bathtub – ewww!
The floor joists were on 24″ centers, with one joist running right under the center of the tub, but anyone getting in or out of the tub would have stepped on a spot dead between joists, and all those years of flexing at that point guaranteed that any caulking was in vain – it would just pull away as the floor bent (and then be removed by a cat), letting dripping and sloshing bath water right down into the floor. Not good. I was fine with replacing the walls, but now I knew I’d be replacing some of the sub floor too. Erg. At least the floor under the toilet was sound.

The floor rot, with the tub gone.
But if I had to replace the floor under the tub, that meant I had to also get the tub itself out. Well, the builder had installed a monolithic tub / shower combo when the house was framed, and there was no way in heck I could get that thing out without removing framing, so I grabbed my sawzall, a sledge, and a prybar, donned a ventilator mask and goggles, and set to work. I spent half a day in a cloud of fiberglass shards, and scaring the neighborhood kids by tossing the chunks out of an upstairs window as I freed them(very cathartic). I even had to cut away the drain pipes using the saw. By the time I finished this I was two weekends into this project, with many miles yet to go.

I don’t think that gap in the sub flooring is at all helpful either. Notice the tub remnants on the right.
The last step was removing the large mirror that had spanned the length of the sinks. This was tricky as an electrical outlet was caulked to it, since the builders were too incompetent to mount that outlet on an actual stud. I cut away the box, slid the mirror out, carefully carried it outside, wrapped it in some old bed sheets, and sledged it to pieces (again, most cathartic). After that I set about cutting out all the water-damaged wallboard. That cleared the decks to tackle the rotted floor.
Stage 1 Rebuilding: Structural Work
By late July, I was ready to cut out the rotten flooring. This took a long time as the flooring was not only screwed, but glued to the joists (which themselves are steel), so I couldn’t use the usual trick of saving the cut-out section as a template for the new one. It came out in chunks and splinters, and I had to run a sonic cutting tool along the joists to remove the old adhesive. I found where the builders had obviously noticed how flexible the floor was even new, and had tried to add in some bracing, but their attempt had been laughably bad.
 I spent about a day cutting and fabricating supports using 2×6’s, then drilling into the steel joists to attach them. On one side I was able to use a T-section, but had to go with stacked spacers on the other side due to wiring being in the way. I also added block where the seams would be, so that this smaller patch panel would not flex independently of the surrounding floor. Some new adhesive and lots of screws later, the floor was secured and immovable. (I debated fixing another part of the floor this way, nearer the door, but that section would not have to bear a tub of water, so we’ll live with it).
The old tub was a monolithic piece, but the new one has separate wall panels. With these interior walls being also on 24″ centers (they’re not load bearing), I needed to add bracing here too so the wall panels would have something on which to hang. I also added a support stringer for the tub edge using lengths of 1×4.

blocking

Patch panel down, stringers for tub edge.
Stage 2: The Tub
I now needed to lay down a mortar bed for the tub, so mixed a batch of quick-setting cement, then slid the tub in before it set (the self-leveling bedding helps to level and support the tub). This was a really tight fit as I found that the builder had made the tub alcove 1/4″ narrower than the rest of the room (I could rant at length about this builder’s issues), and as I was muscling in the tub, the skirt flange at the front snagged the toilet fill pipe stub and snapped it off, flooding the room with gallons of water before I could race downstairs and shut the water off. It was late in the evening, so I was without water in the house till morning (thankfully the wife and kids were away that weekend). Fixed that in the morning.

Toilet stub-out, cracked off. What mess!
With the tub in and nailed to the wall studs, i could attach the shower walls. The back piece could go in as-is, and I quickly had it glued and nailed to the backing studs and blocking, but each side panel needed a couple of days of prep as I had to glue 1×4 boards to later serve as a mounting for the shower doors we planned to install. The left one was straightforward, but I had to drill out the right one to clear the plumbing. It was then I found that I had to relocate that plumbing (untouched from the beginning) back several inches so that the panel could seat properly, and that unfortunately also required some notch-out work to clear wiring.

Tub installed.
Connecting the tub drain was fun too. The new tub is a bit deeper than standard, so the standard drain kit wasn’t long enough in the overflow pipe (another hardware store trip). Thankfully I could get at the drain from downstairs through an access panel (something the builder did right for a change).
The last step was the tub spout – it was long enough for the old tub, but too long for this one, so I had to hacksaw away the tip of it, then sweat on a new fitting before I could spin on the spout. But with that, it was done!

New bracing in the wall.


Adding support for shower doors.

Kitten inspects the finished work
Step 3: Electric

Old lighting.
Remember that outlet box glued in place? Time to mount it properly and correct the wiring. For a fun touch, I also added boxes for some wall sconces that would flank the new medicine cabinet, and added a new switch just for them. I also removed the vanity light bar, and spent a hot August afternoon in the attic, wiring in a new LED ceiling light. That vanity light, with the globe bulbs, had always run really hot, and it was moreover beginning to rust quite badly under its cheap brass plating.

Adding a double switch
Step 4: Wallboard
With the tub done I could set about with the wallboard work. By this time it was late August (remember, I was doing this on weekends). I had to cut away lots of wallboard, more than I had during the initial demo when I wasn’t caring so much about straight lines. But since the walls were opened up, and the master bath plumbing was just inside, I took the time to replace the aging shower control in our own shower. I also cleaned up piles of screws, wood chips, and drywall dust left by the builders (with some help from some curious kittens – they were lucky not be walled in!).


Over Labor Day weekend, my best friend came down, and we spent two dusty days hanging sheetrock, taping, and getting the first layer of mud on the seams. Over the next week or so I kept on spackling and sanding, spackling and sanding, until the walls were smooth and even. At last the room was ready.
Step 5: Painting and Flooring
Mid September, and the whole family pitched in to mask, prime, and paint the room. It was finally starting to look presentable! With the painting done, I laid down and stapled in 1/4″ underlayment over the sub flooring. Then the sheet vinyl (not my best work, I’ll admit, but the flaws are well hidden). To celebrate, I reconnected the toilet (after replacing its aging internals), the first time the bathroom was even partially usable in nearly 3 months.

Primed

#4 helping tape

#2 also taping

Painted, with underlayment complete

Rolling out the vinyl

We have a working toilet again!
Step 6: Finishing the job
Baseboards installed last weekend, tub caulking finished, and then we installed the shower doors. No more did the kids need to use our shower! That just left the cabinets and sinks.
I had the cabinets mostly installed by mid week, except for the sink base. I had to level that and bolt it to the wall, as well as cut back the sink sources and drains for clearance (installed new valves too). Friday night we set in the sinks. Yesterday I connected the drains and faucets. After that I just needed a couple of hours to install towel bars and assorted odds and ends.

Shower Doors In

And Done!

Ready to add the sink

Another view.
The swamp is fully drained. The bathroom is returned to full usability. I’m beat. Time to take on a fun project.
Published in General
Nice work!
I personally avoid using green board – I find it still rots and falls apart.I prefer hardibacker for walls.
Oh, yes, there have been times where I have used other materials too. I figure, though, that the kids are now old enough that I shouldn’t need them here. I’ve use fiberglass sheetrock, though, in really damp areas to great effect.
Cool. I’ll try it – I don’t love Hardibacker.
It’s been centuries since I’ve watched a job like this come to fruition.
Wow!
Makes me proud to be an American :)
What did you do about the fogging you complained about?
Glad that has been fixed.
As long as they run the fan (and they were suitably horrified at the water damaged I showed them during demo) it’s not a problem.
Hrumpf. I’m reminded of my father’s constant complaints to us my entire life, blaming us for spilled water when we showered. We were continuously instructed on ever more elaborate methods of sealing the shower curtain, strategic placement of sponges, creative sculpted caulking, but there was always water on the floor after a shower. At the same time we had a perpetually swampy back yard and he installed drainage sumps in the back yard. I’m still scarred by it.
Then when I was in my 20’s my dad learned that a pipe was loose behind the shower wall. He told us that, thinking we would feel better. We didn’t. :)
I feel manlier for just reading about this DYI project. Way to go.
I found that during a plumbing fix last November in this same bathroom – the bathtub tap had been used as a brace by the kids over the years, and thus had been bent. The tap itself was a slip fit (plastic insert into the faucet that sealed with a set screw and o-rings), so with the tap pipe bent it was no longer sealing to the stub out (the deformed pipe meant the o-rings couldn’t seal), and jetting water back into the wall. I removed it while replacing the temp control valve, put in a new stub, and sweated on a threaded fitting so it would seal up properly in future.
It always looks so easy in the books and on HGTV but never goes as planned. My joke when I drive by Home Depot or Lowe’s is to utter, “Don’t do it.” Tried to hang a wall clock one time in Florida and tried to find the stud using the stud finder. I didn’t know they used metal bars instead of wooden studs. The poor stud finder magnet went crazy. Congratulations. Looks great.
Lowe’s had a series of funny ads about the “never goes as planned” aspect of home improvement a year or two ago. This was one of my favorites. So true to life:
https://www.youtube.com/watch?v=49wRKKdEOBU
Maybe my remodeling efforts go a little better because I’ve spent my whole life in construction, but a plumbing project still takes 3 trips to the hardware store.